Archive for April, 2016

Parceler: Say good-bye to all that boilerplate code

On Android, if you like typing tons of lines of boilerplate for every property in your Parcelable classes, then this article is not for you.  So, go about your business citizen.

However, if you would like to create your class with 2 tiny additions and call it a day, you’re gonna love this post!

UPDATE – thanks to the author, John Ericksen, for pointing out that Parceler does not actually create equals and hashCode methods.  I have updated the examples and the post to properly reflect this

Parceling is one technique for passing objects from one context to another in Android apps.  To pass the objects along, they must implement the Parcelable interface and you’re forced to implement the methods and type all of that boilerplate code in-between.  In many cases, your objects may contain tons of properties and that equates to exponential typing.  In order to deal with such boilerplate code, we implement rules at Dreamsocket like organizing the properties in alphabetical order because of the requirement to write to and read from the parcels in the same order, and I’m sure you’ve developed your own methods of trying to drudge through copy/pasting the properties in as fast and efficient a manner as possible.

While Android Studio does a great job in helping generate the necessary methods to implement, this solution is a massive waste of valuable time and prone to mistakes.

Introducing Parceler.

Parceler is a code generation library that generates the Android Parcelable boilerplate source code.

In a nut shell, add the @Parcel  annotation to your POJO and a blank constructor (UPDATE:  a blank constructor is necessary ONLY when another constructor with parameters exists – otherwise, you can drop the constructor completely), and you’re in business.  What’s that you say??  Impossible?  Take a look at a comparison between these 2 versions of the same object called “Jedi”.  The first version implements Parcelable along with all of its methods and the other is a Parceler version of the same object structure:

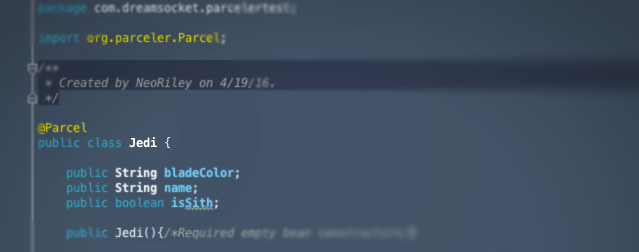
Parcelable version (64 lines of code):

package com.dreamsocket.parcelertest;

import android.os.Parcel;
import android.os.Parcelable;

public class Jedi implements Parcelable {
    public String bladeColor;
    public Long id;
    public String homePlanet;
    public boolean hasPadawan;
    public boolean isPadawan;
    public boolean isSith;
    public String master;
    public String name;

    public Jedi() {}

    public static final Parcelable.Creator<Jedi> CREATOR = new Parcelable.Creator<Jedi>() {
        public Jedi createFromParcel(Parcel in) {
            return new Jedi(in);
        }

        public Jedi[] newArray(int size) {
            return new Jedi[size];
        }
    };

    private Jedi(Parcel p_in){
        this.bladeColor = p_in.readString();
        this.id = p_in.readLong();
        this.homePlanet = p_in.readString();
        this.hasPadawan = p_in.readInt() == 1;
        this.isPadawan = p_in.readInt() == 1;
        this.isSith = p_in.readInt() == 1;
        this.master = p_in.readString();
        this.name = p_in.readString();
    }

    @Override
    public void writeToParcel(Parcel dest, int flags) {
        dest.writeString(this.bladeColor);
        dest.writeLong(this.id);
        dest.writeString(this.homePlanet);
        dest.writeInt(this.hasPadawan ? 1 : 0);
        dest.writeInt(this.isPadawan ? 1 : 0);
        dest.writeInt(this.isSith ? 1 : 0);
        dest.writeString(this.master);
        dest.writeString(this.name);
    }

    @Override
    public int describeContents() {
        return 0;
    }
}

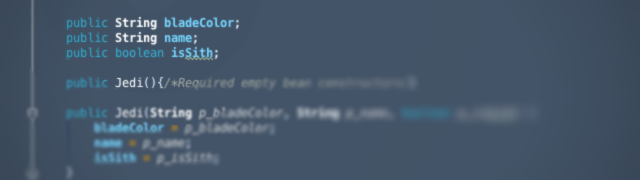
Parceler version (16 lines of code):

package com.dreamsocket.parcelertest.parceler;

import org.parceler.Parcel;

@Parcel
public class Jedi {

    public String bladeColor;
    public Long id;
    public String homePlanet;
    public boolean hasPadawan;
    public boolean isPadawan;
    public boolean isSith;
    public String master;
    public String name;
}

Essentially, Parceler is creating a Parcelable wrapper class for use with Parcels.wrap() and Parcels.unwrap() static methods at runtime, while your original class is left as is.

Now, when you’re ready to use Parceler in production, create your Parcelable with Parcels.wrap() method:

Parcelable wrapped = Parcels.wrap(jedi);

and then use Parcels.unwrap() to retrieve your object:

Jedi jedi = Parcels.unwrap(wrapped);

Parceler also offers a level of consistency between developers.   For example, a seemingly harmless action of how to read/write booleans can be achieved in several different ways.  This stackoverflow example shows how easy it is for a team of developers to approach something this simple and yet come up with several different implementations.  Parceler eliminates these types of issues.

For more information on Parceler and it’s many features, head on over to its Github repo and check out the readme

Have a bandit day!

Psychoanalyst Sigmund Freud distinguished female orgasms as clitoral orgasms in young, immature and vaginal women in those with a healthy sexual response. Here’s a list of them:. There are other forms of orgasm that Freud and Dodson largely rule out, but many others have described. newzealandrx.com For example:.

Comment prendre du viagra Cialis 20mg pas cher Sbau associés une hypertrophie bénigne de la prostate. Sildenafil mg prix Prix cialis 20mg. canada casino online Elle est également indiquée chez les hommes ayant des troubles urinaires dûs à une hypertophie de la prostate.

Automated Testing for Android Development

Here at Dreamsocket, we’ve been doing Android development for years. And we’re always trying to improve our process and add to our tool chain, allowing us to deliver higher quality apps in less time. A big push we’re currently on is getting unit and UI testing integrated into our build process.

There are two types of testing for Android:

  1. Unit tests using JUnit.
  2. UI Testing using Espresso.

Unit Testing with JUnit

Unit tests verify individual units of logic: does this method return what it should when it is passed specific parameters? What happens when incorrect or senseless parameters are passed?

Unit tests are not run within an Android app, so there is no context. So it’s not really possible to do any kind of testing of UI objects (anything that extends View). In some instances, you may be able to create a mock context (see Mockito) and create an instance of a custom UI object and test some of its non-UI logic, but in practice, something in that class is eventually going to call some non-trivial method on the mock context and it’s going to crash.

So unit tests are really for testing data objects or classes that manipulate data objects or perform the business logic of the app. Note that you can unit test a class that accesses UI objects. You’d just need to mock those objects, so that you aren’t attempting to create actual UI objects.

UI testing using Espresso

UI tests actually create a context (they actually instantiate an activity or service), thus they can instantiate and run View-based UI objects. Espresso has methods to locate specific views and perform user actions such as clicks, presses, gestures, text entry, etc. on individual components of those views and verify the state of views after these actions have been performed.

Setup

Gradle

For JUnit unit tests, you’ll need to add some “testCompile” dependencies in your app’s gradle build file. These go in the “dependencies” section of the build file.

testCompile 'junit:junit:4.12'
testCompile 'org.mockito:mockito-core:1.10.19'

Mockito is optional, but is useful for creating mock objects to use in your tests.

For Espresso UI tests, you’ll need to add some “androidTestCompile” dependencies.

androidTestCompile 'com.android.support.test.espresso:espresso-core:2.2.2'
androidTestCompile 'com.android.support:support-annotations:23.0.1'
androidTestCompile 'com.android.support.test:runner:0.5'

The app itself possibly has a dependency for the appcompat library like so.

compile 'com.android.support:appcompat-v7:23.2.1'

But this version of the appcompat library may be in conflict with the version of appcompat that Espresso is using. So if you run into an error stating something along those lines, you can force Espresso to use the same version as the app:

androidTestCompile 'com.android.support:appcompat-v7:23.2.1'

Then, in the android / defaultConfig section of the gradle build file, add this line:

testInstrumentationRunner "android.support.test.runner.AndroidJUnitRunner"

This lets the app know how to run your tests.

Test Packages

The test classes for the two types of tests go in specific places.

JUnit unit tests should go in a directory named test under src. And Espresso UI tests should go in an androidTest directory under src.

So your project should look something like this:

Screen Shot 2016-04-06 at 10.31.25 AM

Note that under app/src, there are androidTest, main, and test directories.

Test Classes

Within the test directories, you’d have your normal java/com/dreamsocket/etc paths and eventually your classes, which should match the package and class name of the class you are testing in most cases, e.g., if you are testing

com.dreamsocket.widgets.video.UIVideoPlayer.java

The test class would probably be

com.dreamsocket.widgets.video.UIVideoPlayerTest.java

Within src/androidTest/java

This way, you can always find the tests that test a particular class, because they have the same package name.

JUnit Test Classes

For JUnit unit tests, you just need a very basic class. It doesn’t need to extend or implement anything. It should be public, take no parameters and return void.

It’s useful to do static imports for the JUnit Assert methods and Mockito mock methods:

import static org.junit.Assert.*;
import static org.mockito.Mockito.*;

As you’ll be using them a lot and now you can just say assert(something) and mock(something);

Test methods are annotated with @Test. These usually perform some action on an object and then make an assertion about that object’s state.

@Test
public void TestDataObject() {
var foo = new Foo();
assertNotNull(foo);

foo.setBar(99);
assertEquals(foo.getBar(), 99);
}

You can also add a comment as the first parameter. This can be helpful when a test fails. The comment you entered will be displayed.

@Test
public void TestDataObject() {
var foo = new Foo();
assertNotNull("foo should exist.", foo);

foo.setBar(99);
assertEquals(“bar should be equal to 99”, foo.getBar(), 99);
}

Obviously, those are rather useless comments, but in some cases, it can be very helpful to document the intention.

You can also add methods with @Before and @After annotations. The @Before method will be run multiple times, before every single @Test method, and the @After method will be run after every single @Test method is complete. These can be used to create and destroy objects or mock objects for tests, so the objects are always in a new, fresh state for each test, not in some changed state from the previous test.

Espresso Test Classes

UI Testing classes are a bit more complex. First of all the class itself needs a couple of annotations:

@RunWith(AndroidJUnit4.class)
@LargeTest
public class UIVideoTest {

}

There are also a bunch of static imports that make coding UI tests easier. Here are some:

import static android.support.test.espresso.Espresso.*;
import static android.support.test.espresso.action.ViewActions.*;
import static android.support.test.espresso.assertion.ViewAssertions.*;
import static android.support.test.espresso.matcher.ViewMatchers.*;

Then you need an ActivityTestRule. This specifies which activity you are testing. For each @Test method, Espresso will launch that activity, then run the @Before methods, then run the @Test method, then the @After method, then terminate the activity. So each @Test method gets the activity in its pristine, just launched state.

@Rule
public ActivityTestRule m_ActivityRule = new ActivityTestRule(MainActivity.class);

There is also a ServiceTestRule if you want to test services.

Then you set up @Before, @After and @Test methods the same as in JUnit.

The flow for Espresso tests is:

  1. Locate a view.
  2. Perform an action on that view.
  3. Do an assertion on that, or some other view.

For example, say you have a button that displays a particular view. You can locate the button, perform a click action on that button, and then check that the other view is now visible.

Locating views is done with onView(). You pass this a view matcher. A view matcher finds a view with specific attributes. You can almost think of it like JQuery for Android views. For example, to locate a view with a particular id:

onView(withId(R.id.play_button))

Or a view that has particular text:

onView(matches(withText("Play"))

There are other matchers as well. It’s important to make your matcher specific enough so that it finds a single view. If your matcher finds multiple views, you will get an error.

Once you have a view, perform a view action on it, such as a click:

onView(withId(R.id.play_button))
.perform(click())

There are other types of view actions – double clicks, long presses, back button, key presses, text input, gestures, etc.

Then you would perform a view assertion. You could assert something on the same view:

onView(withId(R.id.play_button))
.perform(click())
.check(matches(withText("Pause")));

In other words, when the button is clicked, its text should change to “Pause”. So you look for a view that contains the text, “Pause” and if that exists and matches the view you just found, the test passes.

Or you can check another view at that point.

onView(withId(R.id.cc_button))
.perform(click());
onView(withId(R.id.captions))
.check(matches(isDisplayed()));

Click the closed caption button, then check if the captions view is displayed.

There’s also an onData method that is used for adapter views.

There are many other types of matchers, actions, assertions. This cheat sheet is useful.

https://google.github.io/android-testing-support-library/docs/espresso/cheatsheet/index.html

Running Tests

Once you have a test class with some test methods, you can run tests with Control-Shift-R. If your cursor is within a specific test method, it will run that one method only. If your cursor is outside of any methods, it will run the whole class.

Once you’ve run a particular test method or class, it will show up in the configuration menu at the top of Android Studio and you can rerun it by selecting that and running as usual. It’s also possible to edit the configuration to change what is run, or create new configs.

Automating Tests

You can run automated tests of both types with the command line:

./gradlew cAT

cAT stands for “connected Android Test”. A device or emulator needs to be active on the machine where the testing is being done, if you are running UI tests. The output for the tests will be html documents in the project directory under

app/build/reports/androidTests

And

app/build/reports/tests

Or you can access an xml version of the test results at

app/build/test-results/

And

app/build/outputs/androidTest-results/

Which will look something like this:

<?xml version="1.0" encoding="UTF-8"?>
<testsuite name="com.dreamsocket.testingdemo.data.VideoTest" tests="3" skipped="0" failures="0" errors="0" timestamp="2016-04-07T13:59:49" hostname="Keiths-MacBook-Pro.local" time="0.104">
  <properties/>
  <testcase name="testInstantiation" classname="com.dreamsocket.testingdemo.data.VideoTest" time="0.001"/>
  <testcase name="testAuth" classname="com.dreamsocket.testingdemo.data.VideoTest" time="0.103"/>
  <testcase name="testSetGet" classname="com.dreamsocket.testingdemo.data.VideoTest" time="0.0"/>
  <system-out><![CDATA[]]></system-out>
  <system-err><![CDATA[]]></system-err>
</testsuite>

So you can programmatically process the failures and errors attributes within an automated build system.

Links

Overall Android Testing link

http://developer.android.com/training/testing/index.html

Mockito (mock objects)

http://site.mockito.org/mockito/docs/current/org/mockito/Mockito.html

Espresso

https://google.github.io/android-testing-support-library/docs/espresso/basics/index.html