All posts by

From Traditional 3D to HTML5/CSS 3D

I had a chance recently to tackle a project that required several rotating cubes that showed updated text.  Initially, I was excited to work with some simple 3D in HTML5 using div elements, but that excitement was lost when I struggled to reconcile my years of 3D development with this type of web development.  I’m used to a “world” with a “camera” type of situation, and so I set out to try and control the HTML elements in a similar fashion.

The requirements were that the “cubes” had to have their own camera view, so to speak.  They couldn’t all use the same one since this would cause a perspective issue when you move them to the outer edges and areas of the view.

/**
 * Created by NeoRiley on 5/2/16.
 */

function run(){
    createBillboard({x:20, y:20, width: 350, height: 350});
    createBillboard({x:400, y:20, width: 350, height: 350});
    createBillboard({x:200, y:350, width: 350, height: 350});
}

function createBillboard(p_bounds){
    var world = create3DWorld(p_bounds);

    var billboard = document.createElement("div");
    billboard.id = "billboard";
    billboard.style.webkitTransformStyle = "preserve-3d";
    billboard.style.width = p_bounds.width + "px";
    billboard.style.height = p_bounds.height + "px";
    billboard.style.position = "absolute";
    billboard.style.top = "0px";
    billboard.style.left = "0px";
    billboard.style.overflow = "visible";
    billboard.className = "rotating";
    
    var str = "l0l";

    var panel_front = $createPanel(str, p_bounds);
    panel_front.style.color = "#FFFFFF";
    panel_front.style.background = "rgba(0, 255, 0, 0.5";

    var panel_back = $createPanel(str, p_bounds);
    panel_back.style.color = "#FFFFFF";
    panel_back.style.background = "rgba(0, 0, 255, 0.5";

    var panel_left = $createPanel(str, p_bounds);
    panel_left.style.color = "#FFFFFF";
    panel_left.style.background = "rgba(255, 0, 0, 0.5";

    var panel_right = $createPanel(str, p_bounds);
    panel_right.style.color = "#FFFFFF";
    panel_right.style.background = "rgba(255, 156, 0, 0.5";

    world.appendChild(billboard);
    billboard.appendChild(panel_front);
    billboard.appendChild(panel_back);
    billboard.appendChild(panel_left);
    billboard.appendChild(panel_right);

    panel_front.style.webkitTransform = "translateZ(10px)";
    panel_back.style.webkitTransform = "rotateY(180deg) translateZ(10px)";
    panel_left.style.webkitTransform = "rotateY(90deg) translateZ(10px)";
    panel_right.style.webkitTransform = "rotateY(270deg) translateZ(10px)";
}

function create3DWorld(p_bounds){
    var camera = document.createElement("div");
    camera.id = "camera";
    camera.style.webkitPerspective = "350px";
    camera.style.webkitTransformStyle = "flat";
    camera.style.width = p_bounds.width + "px";
    camera.style.height = p_bounds.height + "px";
    camera.style.position = "absolute";
    camera.style.top = p_bounds.y + "px";
    camera.style.left = p_bounds.x + "px";
    camera.style.overflow = "hidden";


    var world = document.createElement("div");
    world.id = "world";
    world.style.webkitTransformStyle = "preserve-3d";
    world.style.width = p_bounds.width + "px";
    world.style.height = p_bounds.height + "px";
    world.style.position = "absolute";
    world.style.top = "0px";
    world.style.left = "0px";
    world.style.overflow = "visible";

    document.body.appendChild(camera);
    camera.appendChild(world);

    return world;
}

//////////////////////////////////////////////////////////////////////////////////
function $createPanel(p_id, p_bounds){
    var panel = document.createElement("div");
    panel.id = "panel_" + p_id;
    panel.style.width = p_bounds.width + "px";
    panel.style.height = p_bounds.height + "px";
    panel.style.position = "absolute";
    panel.style.top = "0px";
    panel.style.left = "0px";
    //panel.style.webkitBackfaceVisibility = "hidden";
    panel.style.overflow = "hidden";

    var text = document.createElement('span');
    text.textContent = p_id;
    text.style.fontSize = "200px";
    var bounds = getBounds(p_id, {fontSize: "200px"});

    text.style.position = "absolute";
    text.style.top = ((p_bounds.width * 0.5) - (bounds.height * 0.5)) + "px";
    text.style.left = ((p_bounds.width * 0.5) - (bounds.width * 0.5)) + "px";
    panel.appendChild(text);

    return panel;
}

//////////////////////////////////////////////////////////////////////////////////
function getBounds(p_text, p_options, p_debug) {
    var element = document.createElement('div'),
        bounds = {width: 0, height: 0};

    element.appendChild(document.createTextNode(p_text));

    p_options.fontFamily = p_options.fontFamily || "arial";
    p_options.fontSize = p_options.fontSize || "12px";
    p_options.fontWeight = p_options.fontWeight || "normal";

    element.style.fontFamily = p_options.fontFamily;
    element.style.fontWeight = p_options.fontWeight;
    element.style.fontSize = p_options.fontSize;
    element.style.position = 'absolute';
    element.style.visibility = p_debug ? 'visible' : 'hidden';
    element.style.left = p_debug ? "0px" : "-1000px";
    element.style.top = p_debug ? "0px" : "-1000px";
    element.style.width = 'auto';
    element.style.height = 'auto';

    if( p_debug ){
        element.style.background = "#FFFF00";
        element.style.color = "#000000";
    }

    document.body.appendChild(element);
    bounds.width = element.offsetWidth;
    bounds.height = element.offsetHeight;
    if( !p_debug ) document.body.removeChild(element);

    return bounds;
}

run();

Fiddle: https://jsfiddle.net/neoRiley/dgezn5wt/

Unit Tests with Parceler and Parcelables

With Android development, unit testing Parcelables isn’t exactly as straight forward as some would think, but thanks to a nice post by Kevin Shultz about the proper way to do it, we have a great baseline to work with when testing our Parceler versions of Parcelables.  In this post, we’ll walk through the unit test for a Parcelable aptly named “JediParcelable” and it’s counter part “Jedi” which uses Parceler to auto-generate the boilerplate code of the Parcelable version of “Jedi” (can I get a pronoun please?!).

Setup

Thanks to Keith Peters, we have a great post about setting up and working with 2 types of unit tests with in Android Studio.  If you haven’t done so, it’s well worth time and a great read!  That said, this post assumes you know something about unit tests with Android.  However, I will cover some key issues that are involved with our specific unit tests involving Parceler and Parcelables.

First, you can clone the example Android Studio project from bitbucket.

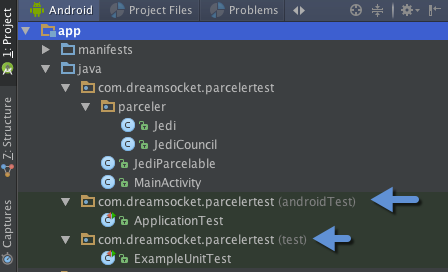
To create this demo, I simply created an “Empty” android project using Android Studio’s wizard.  It created the 2 unit test options of “test” and “androidTest”.  Tests created under the “test” package are JUnit tests – tests which don’t require the Android API.  Tests created under the “androidTest” package are Espresso tests which allow you to leverage the Android API and create tests for UI.
Parceler Android project setup

Android Studio auto creates the “test” and “androidTest” folders

Now for all of this to work properly with JUnit and Espresso, as stated in Keith’s post, you’ll need to add these dependencies to your gradle file:

dependencies {
    compile fileTree(dir: 'libs', include: ['*.jar'])

    testCompile 'junit:junit:4.12'
    testCompile 'org.mockito:mockito-core:1.10.19'

    androidTestCompile 'com.android.support.test.espresso:espresso-core:2.2.2'
    androidTestCompile 'com.android.support:support-annotations:23.0.1'
    androidTestCompile 'com.android.support.test:runner:0.5'
    androidTestCompile 'com.android.support:appcompat-v7:23.2.1'

    compile 'org.parceler:parceler-api:1.1.1'
    apt 'org.parceler:parceler:1.1.1'
    compile 'com.android.support:appcompat-v7:23.2.1'
}

Note:  Adding androidTestCompile ‘com.android.support.appcompat-v7:23.2.1’  to your gradle dependencies is necessary IF you have it as a compile option as well. Otherwise, you’ll see this error when you sync gradle:
Error:Conflict with dependency ‘com.android.support:support-annotations’. Resolved versions for app (23.2.1) and test app (23.1.1) differ. See http://g.co/androidstudio/app-test-app-conflict for details. 

With these dependencies in place, you should be able to sync and start creating tests using Parcelables and Parceler.

Looking at the Unit Tests

For these unit tests with Parceler and Parcelable, I had to create them in the “androidTest” package creating a “JeditTest” class that extends ApplicationTestCase.  Because we’re using Parcelable and Parcel classes, we have to use an Espresso test to run against the Android API.  If you try to run the Parcelable test as a JUnit test, you’ll receive null exception when Parcel.obtain()  returns null in the test.

///////////////////////////////////////////////////////////////////////////////////////////////////////////////

Parcelable Testing

Parcelable testing is a bit trickier than some types of tests.  Since we’re serializing an object and then de-serializing it from a Parcel, we want to verify that:

  1. The object created is truly unique.
  2. The new object’s data matches the original’s.

First, I wanted to create a test with a normal object that extends Parcelable.  If you look at JediParcelable in the sample project, you’ll see a version of the Jedi class that does just that:

import android.os.Parcel;
import android.os.Parcelable;

public class JediParcelable implements Parcelable {
    public String bladeColor;
    public Long id;
    public String homePlanet;
    public boolean hasPadawan;
    public boolean isPadawan;
    public boolean isSith;
    public String master;
    public String name;

    ...
}

The test for this is fairly straightforward:

@Test
public void testJediParcelable() throws Exception {
    JediParcelable aJedi = new JediParcelable();

    aJedi.bladeColor = "blue";
    aJedi.id = 5L;
    aJedi.homePlanet = "Jakku";
    aJedi.hasPadawan = false;
    aJedi.isPadawan = true;
    aJedi.isSith = false;
    aJedi.master = "Luke Skywalker";
    aJedi.name = "Rey Solo";

    Parcel parcel = Parcel.obtain();
    aJedi.writeToParcel(parcel, 0);
    parcel.setDataPosition(0);
    JediParcelable bJedi = JediParcelable.CREATOR.createFromParcel(parcel);

    Log.d(TAG, "aJedi: " + aJedi.toString());
    Log.d(TAG, "bJedi: " + bJedi.toString());

    assertTrue("Jedi are not the same", aJedi.equals(bJedi) );
    assertNotSame("Jedi are same Object", aJedi == bJedi);
}

To simplify:  you grab a Parcel instance with Parcel.obtain()  and write to it via the aJedi.writeToParcel()  method.  This serializes the object into a Parcel that can now be passed on to a new Context or Intent. The most important part of this test is resetting the data position of the Parcel object to zero (0) parcel.setDataPosition(0)  – with the parcel reset, we can now read from it.  Just call the createFromParcel()  method of the JediParcelable’s CREATOR object and we’ll have our new and unique version of the JediParcelable object (bJedi).

To finish, we use 2 assertions to satisfy our goals stated above: check for uniqueness and data integrity. I’ll explain a bit more about those 2 after we cover the next test with Parceler.

///////////////////////////////////////////////////////////////////////////////////////////////////////////////

Parceler Testing

Note: For this next unit test, we’re testing Parceler and if you haven’t read my other post on Parceler, you might want to pop over there for a quick read.

Parceler testing is obviously very similar, since in the end we’re really trying to pass Parcelable objects between Contexts/Intents.  Check out the core of the test:

...
Parcelable wrapped = Parcels.wrap(aJediCouncil);
Parcel parcel = Parcel.obtain();
wrapped.writeToParcel(parcel, 0);
parcel.setDataPosition(0);

/// pulling from created parcel...
Parcelable inputParcelable = ((Parcelable.Creator<Parcelable>)wrapped.getClass().getField("CREATOR").get(null)).createFromParcel(parcel);
JediCouncil bJediCouncil = Parcels.unwrap(inputParcelable);
...

Note that the first thing we need to do is generate the wrapped Parcelable version of the Jedi object.   This is what will be written to the Parcel object. The next main difference is that we have to use the createFromParcel()  method of the wrapped object since Jedi itself does not extend Parcelable – it’s wrapped version DOES, however.

Parcelable inputParcelable = ((Parcelable.Creator<Parcelable>)wrapped.getClass().getField("CREATOR").get(null)).createFromParcel(parcel);

We call the static method unwrap()  of the Parcels class and now we have our new and unique version of the Jedi object (bJediCouncil)!

JediCouncil bJediCouncil = Parcels.unwrap(inputParcelable);

///////////////////////////////////////////////////////////////////////////////////////////////////////////////

Assertions

Now, earlier, I’d mentioned 2 goals for our unit test – uniqueness and data integrity – so let’s take a look at each assertion and break them down.

// assertions
assertNotSame("The councils are equal", aJediCouncil == bJediCouncil);
assertTrue("The councils are NOT equal", aJediCouncil.equals(bJediCouncil));

Uniqueness is essentially making sure that the object is, in fact, serialized/de-serialized to create a unique copy of the original.  This is the reason why I covered how to do a proper Parcelable unit test in the first place.  If done incorrectly, you’ll be left with a false positive while using something like assertNotSame()  or assertFalse()  in which you might compare equality of the 2 objects to themselves (i.e.: obj1 ==  obj2).  When done correctly, these assertions tests are passed, and confirm that the objects were properly serialized/de-serialized.

Data integrity is basically making sure that the values of the original object are passed along completely to the new object.  Making sure the data is equal can vary depending on how you’ve built your objects and their complexity.  For this example, I wanted to test different types of properties that included ArrayLists and HashMaps as well as other Parceler objects to see how Parceler would handle it as well as what was required to create a proper unit test for something like this.

First, Parceler handled it perfectly.  Having other Parceler objects as properties of a Parceler object was no problem – which was one of my directives in testing Parceler at all.

However, comparing a complex object like JediCouncil to a new version of the object meant we would have to override the equals()  method and deal with comparing not only primitives but the ArrayLists and HashMaps.

Note: I should say that there are other ways to compare the properties of objects, and this is not the only way of course.  One way might be to override the toString()  method and compare the returned strings for equality.  The problem with that is with Maps – they do not have any particular sorting or order.  So, if you did a toString()  comparison, results from object to object could be different. And even though the data contains the same information, it will fail the string comparison because the order doesn’t match.

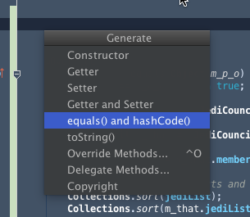
Thankfully, Android Studio provides a very easy wizard to help you get started on your custom equals()  method!  In your class, just press “ALT+ENTER” and you’ll see a context menu with an option to create “equals() and hashCode()” methods for you based on your classes structure:
AS_context_equals

Here’s the original version Android Studio created for me for the JediCouncil class:

@Override
public boolean equals(Object m_p_o) {
    if (this == m_p_o) return true;
    if (!(m_p_o instanceof JediCouncil)) return false;

    JediCouncil m_that = (JediCouncil) m_p_o;

    if (memberCount != m_that.memberCount) return false;
    if (jediList != null ? !jediList.equals(m_that.jediList) : m_that.jediList != null) return false;
    if (!location.equals(m_that.location)) return false;
    if (sithList != null ? !sithList.equals(m_that.sithList) : m_that.sithList != null) return false;
    return forceSensitive != null ? forceSensitive.equals(m_that.forceSensitive) : m_that.forceSensitive == null;
}

Not too bad for starters, eh? It even checks to see if it IS the object being compared – which is our first assertion test 😉

Note: When you override the equals method, always create a hashCode as well – check out Ralf Sternburg’s post for more information on how hashCode and equals compliment each other to avoid object collisions

Now, the real issue with comparing using the equals()  method is dealing with the HashMap objects since they might not be sorted in the same way as the original.  Thankfully, this is fairly straight forward. In the above equals()  method, you’ll see that it tries to match the forceSensitive  and m_that.forceSensitive  objects. This failed our test initially because the sorting was different from object to object.  To fix this, we convert the HashMaps to TreeMap<T> objects and bingo – they’re sorted identically.

Map<String, Jedi> tree_0 = new TreeMap<>(forceSensitive);
Map<String, Jedi> tree_1 = new TreeMap<>(m_that.forceSensitive);

Now we just change the final return line to use tree_0  and tree_1  to compare the two and we get an accurate comparison now.

return forceSensitive != null ? tree_0.equals(tree_1) : m_that.forceSensitive == null;

And, while we’re at it, I went ahead and added sorting for the two ArrayList objects jediList  and sithList :

Collections.sort(jediList);
Collections.sort(m_that.jediList);

The final equals()  method, now does accurate comparisons with our ArrayLists and HashMaps and looks like this in the end:

@Override
public boolean equals(Object m_p_o) {
    if (this == m_p_o) return true;

    if (!(m_p_o instanceof JediCouncil)) return false;

    JediCouncil m_that = (JediCouncil) m_p_o;

    if (memberCount != m_that.memberCount) return false;

    Collections.sort(jediList);
    Collections.sort(m_that.jediList);

    if (jediList != null ? !jediList.equals(m_that.jediList) : m_that.jediList != null) return false;
    if (!location.equals(m_that.location)) return false;
    if (sithList != null ? !sithList.equals(m_that.sithList) : m_that.sithList != null) return false;

    Map<String, Jedi>  tree_0 = new TreeMap<>(forceSensitive);
    Map<String, Jedi>  tree_1 = new TreeMap<>(m_that.forceSensitive);

    return forceSensitive != null ? tree_0.equals(tree_1) : m_that.forceSensitive == null;
}

Conclusion

Creating unit tests for Parcelables/Parceler requires a few things:

  1. Proper setup to serialize/de-serialize the parcelable object
  2. Proper use of assertFalse or assertNotSame() to test object uniqueness
  3. Proper override of the equals() method with respect to what types of properties you may have – especially with regards to any Maps the object contains

In the end, you’ll have a very solid unit test for your parcelables and complete trust that they’re both unique and have passed on the data completely and correctly.

Have a bandit day!

RxJS Observable – forkJoin with nested observables

This is really just for archive sake, but since it took a bit of looking into, I thought it worth posting since I hadn’t actually found the answer anywhere.

If you want to fire off several observable objects async but have to wait until they’re all completed before moving on, you’ll want to give the static forkJoin method a look.  ForkJoin will take an array of observables, execute them and give you back an array of their results when all have completed.

Unfortunately, if you’re using a version of RxJS that’s previous to 5.0, nested observables will complete their task, but forkJoin will not see it without a subscriber.complete() call from the observables that have a nested observable.  This is because RxJS does not have a complete() method on the Observable object until 5.0.0 alpha.1 (as of this writing, i’ve tested with 5.0.0-alpha.1 and 5.0.0-beta.11 successfully).  Once I was able to call “complete()” from the observable that was added to the forkJoin initially, the results were returned successfully.

Conclusion (because that sounded confusing): If you have observables that rely on other observables (nested), they must call “complete()” on the subscriber for forkJoin to realize the jobs are complete.

See the Pen RxJS Observable – forkJoin Example by John Grden (@neoRiley) on CodePen.

Thanks to Brian Troncone for the original JSFiddle

Have a bandit day!

Measuring Text in HTML5

For a while now, I’ve been doing quite a bit of work in HTML5/Javascript/CreateJS.  While the work is enjoyable, dealing with getting the bounds of a text field seems to have many solutions including this grammarly review app to make sure it is well written.

I’ve read through just about every one I could find (and believe me when I say –  there are many), looked through examples and did many tests.  After all that, I’m sharing my final solution for getting the bounds for a string:

function getBounds(p_text, p_options, p_debug) {
        var element = document.createElement('div'),
            bounds = {width: 0, height: 0};

        element.appendChild(document.createTextNode(p_text));

        p_options.fontFamily = p_options.fontFamily || "arial";
        p_options.fontSize = p_options.fontSize || "12px";
        p_options.fontWeight = p_options.fontWeight || "normal";

        element.style.fontFamily = p_options.fontFamily;
        element.style.fontWeight = p_options.fontWeight;
        element.style.fontSize = p_options.fontSize;
        element.style.position = 'absolute';
        element.style.visibility = p_debug ? 'visible' : 'hidden';
        element.style.left = p_debug ? "0px" : "-1000px";
        element.style.top = p_debug ? "0px" : "-1000px";
        element.style.width = 'auto';
        element.style.height = 'auto';
        
        if( p_debug ){
        	element.style.background = "#FFFF00";
          element.style.color = "#000000";
        }

        document.body.appendChild(element);
        bounds.width = element.offsetWidth;
        bounds.height = element.offsetHeight;
        if( !p_debug ) document.body.removeChild(element);

        return bounds;
}

Example call:

function runTest(){
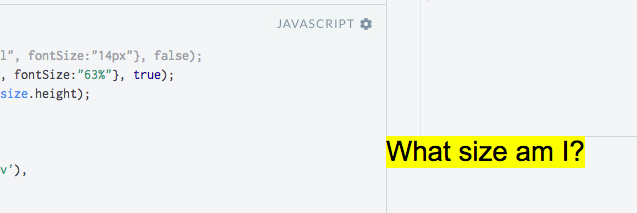
  var str = "What size am I?";
  var size_0 = getBounds(str, {fontFamily: "arial", fontSize:"14px"}, false);
  var size_1 = getBounds(str, {fontFamily: "arial", fontSize:"63%"}, true);
  console.log("perSize: " + size_0.width + ", " + size_0.height);
  console.log("perSize: " + size_1.width + ", " + size_1.height);
}

Fiddle: https://jsfiddle.net/neoRiley/qcphL0g4/

I give some credit to schickling on stackoverflow (only 6 votes?!) for the main inspiration as he aptly identified what I think is the key component: document.createTextNode()

I’d been using JQuery and wanted a solution that worked without a 3rd party tool.  The only thing that reliably gave me the same bounds as JQuery is the above method.  I’ve added debug support should you want to verify that it is indeed testing your string correctly.

GetBoundsOfText

Have a bandit day!

Parceler: Say good-bye to all that boilerplate code

On Android, if you like typing tons of lines of boilerplate for every property in your Parcelable classes, then this article is not for you.  So, go about your business citizen.

However, if you would like to create your class with 2 tiny additions and call it a day, you’re gonna love this post!

UPDATE – thanks to the author, John Ericksen, for pointing out that Parceler does not actually create equals and hashCode methods.  I have updated the examples and the post to properly reflect this

Parceling is one technique for passing objects from one context to another in Android apps.  To pass the objects along, they must implement the Parcelable interface and you’re forced to implement the methods and type all of that boilerplate code in-between.  In many cases, your objects may contain tons of properties and that equates to exponential typing.  In order to deal with such boilerplate code, we implement rules at Dreamsocket like organizing the properties in alphabetical order because of the requirement to write to and read from the parcels in the same order, and I’m sure you’ve developed your own methods of trying to drudge through copy/pasting the properties in as fast and efficient a manner as possible.

While Android Studio does a great job in helping generate the necessary methods to implement, this solution is a massive waste of valuable time and prone to mistakes.

Introducing Parceler.

Parceler is a code generation library that generates the Android Parcelable boilerplate source code.

In a nut shell, add the @Parcel  annotation to your POJO and a blank constructor (UPDATE:  a blank constructor is necessary ONLY when another constructor with parameters exists – otherwise, you can drop the constructor completely), and you’re in business.  What’s that you say??  Impossible?  Take a look at a comparison between these 2 versions of the same object called “Jedi”.  The first version implements Parcelable along with all of its methods and the other is a Parceler version of the same object structure:

Parcelable version (64 lines of code):

package com.dreamsocket.parcelertest;

import android.os.Parcel;
import android.os.Parcelable;

public class Jedi implements Parcelable {
    public String bladeColor;
    public Long id;
    public String homePlanet;
    public boolean hasPadawan;
    public boolean isPadawan;
    public boolean isSith;
    public String master;
    public String name;

    public Jedi() {}

    public static final Parcelable.Creator<Jedi> CREATOR = new Parcelable.Creator<Jedi>() {
        public Jedi createFromParcel(Parcel in) {
            return new Jedi(in);
        }

        public Jedi[] newArray(int size) {
            return new Jedi[size];
        }
    };

    private Jedi(Parcel p_in){
        this.bladeColor = p_in.readString();
        this.id = p_in.readLong();
        this.homePlanet = p_in.readString();
        this.hasPadawan = p_in.readInt() == 1;
        this.isPadawan = p_in.readInt() == 1;
        this.isSith = p_in.readInt() == 1;
        this.master = p_in.readString();
        this.name = p_in.readString();
    }

    @Override
    public void writeToParcel(Parcel dest, int flags) {
        dest.writeString(this.bladeColor);
        dest.writeLong(this.id);
        dest.writeString(this.homePlanet);
        dest.writeInt(this.hasPadawan ? 1 : 0);
        dest.writeInt(this.isPadawan ? 1 : 0);
        dest.writeInt(this.isSith ? 1 : 0);
        dest.writeString(this.master);
        dest.writeString(this.name);
    }

    @Override
    public int describeContents() {
        return 0;
    }
}

Parceler version (16 lines of code):

package com.dreamsocket.parcelertest.parceler;

import org.parceler.Parcel;

@Parcel
public class Jedi {

    public String bladeColor;
    public Long id;
    public String homePlanet;
    public boolean hasPadawan;
    public boolean isPadawan;
    public boolean isSith;
    public String master;
    public String name;
}

Essentially, Parceler is creating a Parcelable wrapper class for use with Parcels.wrap() and Parcels.unwrap() static methods at runtime, while your original class is left as is.

Now, when you’re ready to use Parceler in production, create your Parcelable with Parcels.wrap() method:

Parcelable wrapped = Parcels.wrap(jedi);

and then use Parcels.unwrap() to retrieve your object:

Jedi jedi = Parcels.unwrap(wrapped);

Parceler also offers a level of consistency between developers.   For example, a seemingly harmless action of how to read/write booleans can be achieved in several different ways.  This stackoverflow example shows how easy it is for a team of developers to approach something this simple and yet come up with several different implementations.  Parceler eliminates these types of issues.

For more information on Parceler and it’s many features, head on over to its Github repo and check out the readme

Have a bandit day!

Psychoanalyst Sigmund Freud distinguished female orgasms as clitoral orgasms in young, immature and vaginal women in those with a healthy sexual response. Here’s a list of them:. There are other forms of orgasm that Freud and Dodson largely rule out, but many others have described. newzealandrx.com For example:.

Comment prendre du viagra Cialis 20mg pas cher Sbau associés une hypertrophie bénigne de la prostate. Sildenafil mg prix Prix cialis 20mg. canada casino online Elle est également indiquée chez les hommes ayant des troubles urinaires dûs à une hypertophie de la prostate.